Appearance
Using custom fonts in Editorial 3.6.1 and newer
Important
For Editorial 3.6.1 and Newer
This article is for Editorial 3.6.1 (released June 17, 2020) and subsequent versions. If you have an earlier version of the theme and do not wish to upgrade, follow the older, SCSS-based version of this tutorial:
Note
This is an advanced customization guide that requires editing theme code. These actions are not supported by Switch Themes or Shopify. We recommend hiring an expert if you're not comfortable editing Liquid, HTML, CSS, and Javascript.
Before you customize a theme, make a backup. Refer to Shopify help: Duplicating themes.
Our themes use Shopify's Font Picker, which gives you access to hundreds of premium and open source fonts. If you'd like to use a font that's not available in the Font Picker, you can achieve this by making some edits to theme code.
This is a two-step process involving:
- Loading the fonts through a font service or using web font files, and
- Applying the fonts to the theme using the CSS stylesheet.
Loading the fonts
Using a font service
If you're using a font service like Adobe Fonts, TypeNetwork, cloud.typography or Google Fonts, you'll have a code snippet, something that looks like this:
html
<link rel="stylesheet" href="https://use.typeservice.net/a1b2c3d4.css">Open the theme.liquid file in the code editor, paste the snippet on a line before the closing </head> tag. Then, proceed to Applying the fonts, the next step in this guide.
Using web font files (.woff, .ttf, .eot, etc.)
Note
Please make sure your font license allows embedding the fonts in a website and that your traffic is within the page view limits stated by your license. If in doubt, contact the vendor.
Upload the files to the "Assets" folder of the theme. Open the theme code editor, navigate to Assets, and click "Add a new asset." Using the "Upload file" tab, upload the font files one by one.
You may at this point be wondering if you really need all of those different formats. You'll find a good discussion of browsers' web font requirements in Chris Coyier's article: CSS-Tricks: How to use @font-face in CSS. We recommend sticking to just woff and woff2 as that covers the browsers in Shopify's browser support guidelines.
Next, we need to pull the font files into the stylesheet with a @font-face declaration. Refer to Mozilla Developer Network: @font-face. You can do this in the theme.min.css.liquid file – or, if you're customize the CSS beyond just adding fonts, refer to Customizing CSS in themes without Scss. You can add this declaration to the top of the file assets/theme.min.css.liquid, replacing the name of the font and the filename of the webfont files:
css
  /* Regular weight, regular style */
  @font-face {
    font-family: 'Font Name'; /* Font name - how you want to refer to it in this file. Can be anything. */
    src: url('{{ 'The-Exact-Name-of-the-File-You-Uploaded.woff' | asset_url }}') format('woff'),
         url('{{ 'The-Exact-Name-of-the-File-You-Uploaded.woff2' | asset_url }}') format('woff2');
    font-weight: normal;
    font-style: normal;
  }

  /* Regular weight, italic */
  @font-face {
    font-family: 'Font Name'; /* Same as Above */
    src: url('{{ 'The-Exact-Name-of-the-File-You-Uploaded-Italic.woff' | asset_url }}') format('woff'),
         url('{{ 'The-Exact-Name-of-the-File-You-Uploaded-Italic.woff2' | asset_url }}') format('woff2');
    font-weight: normal;
    font-style: italic;
  }

  /* Bold, regular style */
  @font-face {
    font-family: 'Font Name'; /* Same as Above */
    src: url('{{ 'The-Exact-Name-of-the-File-You-Uploaded-Bold.woff' | asset_url }}') format('woff'),
         url('{{ 'The-Exact-Name-of-the-File-You-Uploaded-Bold.woff2' | asset_url }}') format('woff2');
    font-weight: bold;
    font-style: normal;
  }
Add as many of these declarations as you need to cover the combinations of font weights and styles in your custom fonts. From a design perspective, it's good to keep these to a minimum, as each font file adds to your site's page load time and creates some drawing work for the browser once the page has loaded, both of which add up. When you're done, you'll have a font-family value that you can use in CSS rules to refer to the custom web font.
Applying the fonts
You can now change the font-family property of the selectors you wish to modify.
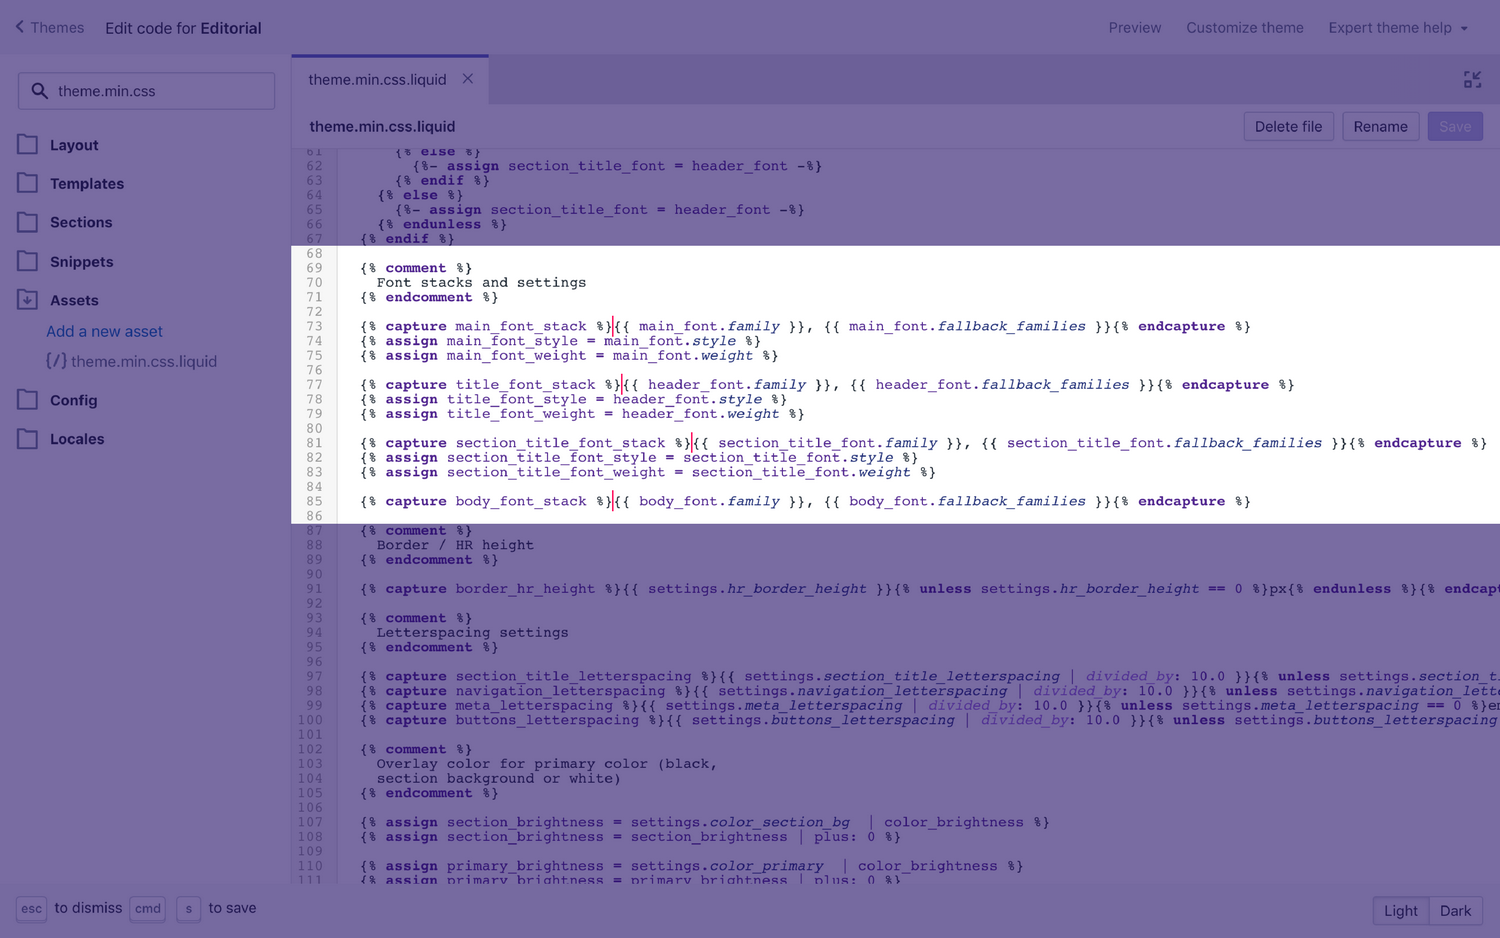
The easiest way to do this is to add your font name to the theme's existing Font stacks, which by default represent the font choices available in Theme Settings and are: the Main font, the Title font, and the Body font, as well as the Section title font (which in Theme Settings is represented with a dropdown selector letting you choose from among the above).
The Font stacks are defined as Liquid variables in the file theme.min.css.liquid. The screenshot below shows where you would insert your custom font's name in the code:

If we wanted to change the headings to use Forma DJR Banner from Adobe Fonts, we would change line 77 from this:
liquid
{% capture title_font_stack %}{{ header_font.family }}, {{ header_font.fallback_families }}{% endcapture %}To this:
liquid
{% capture title_font_stack %}"forma-djr-banner", {{ header_font.family }}, {{ header_font.fallback_families }}{% endcapture %}If you used custom font files, you would provide instead the name of the font, exactly as you defined it in the @font-face declaration in Step 1.
Customizing individual elements
If you don't want to apply the font to all the elements covered by the font stack, and would prefer finer-grained control, you can figure out the target element's CSS class and add custom CSS rules to the theme.css.liquid stylesheet. Refer to Using the web inspector.
You would also want to modify the file snippets/style-tags.liquid to point to theme.css.liquid instead of theme.min.css.liquid, as described in Customizing CSS in themes without Sass.